
| 일 | 월 | 화 | 수 | 목 | 금 | 토 |
|---|---|---|---|---|---|---|
| 1 | 2 | 3 | 4 | 5 | ||
| 6 | 7 | 8 | 9 | 10 | 11 | 12 |
| 13 | 14 | 15 | 16 | 17 | 18 | 19 |
| 20 | 21 | 22 | 23 | 24 | 25 | 26 |
| 27 | 28 | 29 | 30 |
- S3
- write back
- 해킹송
- istio
- CloudFormation
- APIGateway
- cbt
- CloudWatch
- 정보처리기능사
- Lambda
- server
- EKS
- CodePipeline
- CodeCommit
- Round Robin
- access_log
- 쿠버네티스
- AWS
- SQS
- DNS
- 유나인버거조인트
- DaemonSet
- Kinesis
- write Through
- 3AZ
- Kubernetes
- cloudwatch-agent
- ASG
- stateful
- CodeBuild
- Today
- Total
cloud bee
AWS EKS에서 EFS 기능 구현하기 본문
오늘은 EKS에서 EFS 기능을 구현할 것이다. https://beecloud.tistory.com/7
AWS EKS 실습 입문( EKS 생성&연결, 도커 이미지 작성)
오늘은 EKS를 실습해보도록 한다. 우선 EKS를 시작하기전에 VPC, 서브넷, 라우팅 테이블, 인터넷 게이트웨이, 보안그룹 등 기본적인 네트워킹 설정을 한다. vpc.yml 파일로 stack을 작성하고 cloudformation
beecloud.tistory.com
위 링크에서 생성하였던 instance를 통해 cluster를 사용할 것이다.
우선 CSI를 사용하기 위해 정책부터 생성하도록 한다.
curl -o iam-policy-example.json https://raw.githubusercontent.com/kubernetes-sigs/aws-efs-csi-driver/master/docs/iam-policy-example.json
aws iam create-policy \
    --policy-name AmazonEKS_EFS_CSI_Driver_Policy \
    --policy-document file://iam-policy-example.json
이제 eksctl을 통해 iam 역할을 연결해 주도록 한다.
다음 eksctl 명령어는 아래와 같다. 해당 코드 블록에 기입되어 있는 111122223333은 본인의 어카운트 아이디로 변경한다.
eksctl utils associate-iam-oidc-provider --region=ap-northeast-2 --cluster=eks-cluster --approve

eksctl create iamserviceaccount \
    --cluster eks-cluster \
    --namespace kube-system \
    --name efs-csi-controller-sa \
    --attach-policy-arn arn:aws:iam::111122223333:policy/AmazonEKS_EFS_CSI_Driver_Policy \
    --approve \
    --region ap-northeast-2
이제 이런식으로 다 생성이 되었다면 helm 차트를 설치해 준다.
wget https://get.helm.sh/helm-v3.8.2-linux-amd64.tar.gz
tar -zxvf helm-v3.8.2-linux-amd64.tar.gz
sudo chmod +x linux-amd64/helm
sudo mv linux-amd64/helm /bin/helm
설치하였다면 다음 명령어를 통해 helm repository를 추가해 준다.
helm repo add aws-efs-csi-driver https://kubernetes-sigs.github.io/aws-efs-csi-driver/
helm repo update
이제 helm 차트를 통해 드라이버 릴리스를 설치하도록 한다.
helm upgrade -i aws-efs-csi-driver aws-efs-csi-driver/aws-efs-csi-driver \
    --namespace kube-system \
    --set image.repository=602401143452.dkr.ecr.ap-northeast-2.amazonaws.com/eks/aws-efs-csi-driver \
    --set controller.serviceAccount.create=false \
    --set controller.serviceAccount.name=efs-csi-controller-sa
이제 다음과 같은 명령어를 입력하여 조회를 해본다.
kubectl get pod -n kube-system -l "app.kubernetes.io/name=aws-efs-csi-driver, app.kubernetes.io/instance=aws-efs-csi-driver"
EFS 파일 시스템 생성
amazon eks cluster에 대한 amazon efs file system 생성
cluster에서 쓰이는 vpc id를 검색하여 다음 단계에서도 사용할 수 있게 변수로 저장한다.
vpc_id=$(aws eks describe-cluster \
    --name eks-cluster \
    --query "cluster.resourcesVpcConfig.vpcId" \
    --output text)
이제 검색하였던 해당 vpc의 cidr 대역을 변수로 저장한다.
cidr_range=$(aws ec2 describe-vpcs \
    --vpc-ids $vpc_id \
    --query "Vpcs[].CidrBlock" \
    --output text)
이제 amazon efs 탑재 지점에 대한 인바운드 NFS 트래픽을 허용하는 규칙을 사용하도록 보안그룹을 생성한다.
security_group_id=$(aws ec2 create-security-group \
    --group-name MyEfsSecurityGroup \
    --description "My EFS security group" \
    --vpc-id $vpc_id \
    --output text)

aws ec2 authorize-security-group-ingress \
    --group-id $security_group_id \
    --protocol tcp \
    --port 2049 \
    --cidr $cidr_range
이제 파일시스템을 만든다.
file_system_id=$(aws efs create-file-system \
    --region ap-northeast-2 \
    --performance-mode generalPurpose \
    --query 'FileSystemId' \
    --output text)
탑재 대상을 만든다.
kubectl get node 10.25.10.0/24 대역에 있는 node를 대상으로 삼고 진행한다.

서브넷 마스크를 조회한다.
aws ec2 describe-subnets \
    --filters "Name=vpc-id,Values=$vpc_id" \
    --query 'Subnets[*].{SubnetId: SubnetId,AvailabilityZone: AvailabilityZone,CidrBlock: CidrBlock}' \
    --output table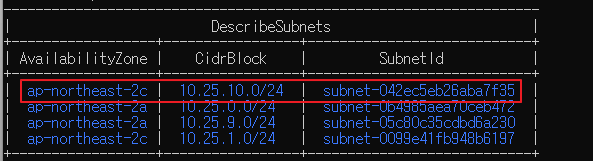
해당 대역의 서브넷 아이디를 복사한다.
이제 한번 다음과 같은 명령어를 실행해 보자
aws efs create-mount-target \
    --file-system-id $file_system_id \
    --subnet-id 서브넷아이디 \
    --security-groups $security_group_id
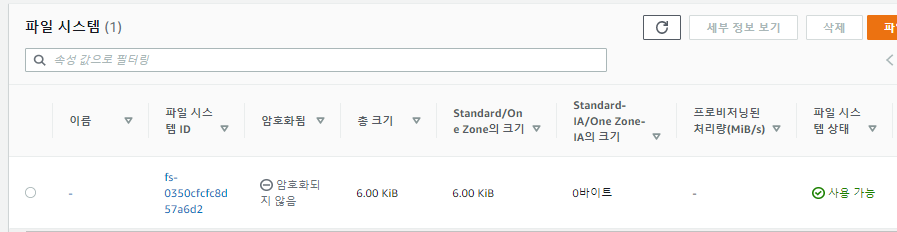
실행을 하였을 때 amazon efs file system이 생성된 것을 확인할 수 있다.
application 배포
dynamic application, static application 등은 아래 링크를 통해 구현할 수 있다.
https://docs.aws.amazon.com/ko_kr/eks/latest/userguide/efs-csi.html
Amazon EFS CSI 드라이버 - Amazon EKS
Amazon EFS는 탄력적인 파일 시스템이므로 파일 시스템 용량 한도를 적용하지 않습니다. 영구 볼륨 및 영구 볼륨 클레임의 실제 스토리지 용량 값은 파일 시스템을 생성할 때는 사용되지 않습니다.
docs.aws.amazon.com
'AWS > kubernetes' 카테고리의 다른 글
| AWS EKS calico 설치 및 방법 (0) | 2023.02.05 |
|---|---|
| kubernetes daemonset 이란? (0) | 2023.01.11 |
| 3AZ VPC를 cloudformation을 통해 생성 (0) | 2022.10.31 |
| AWS EKS 실습 입문( EKS 생성&연결, 도커 이미지 작성) (0) | 2022.10.22 |


