
| 일 | 월 | 화 | 수 | 목 | 금 | 토 |
|---|---|---|---|---|---|---|
| 1 | 2 | 3 | 4 | 5 | ||
| 6 | 7 | 8 | 9 | 10 | 11 | 12 |
| 13 | 14 | 15 | 16 | 17 | 18 | 19 |
| 20 | 21 | 22 | 23 | 24 | 25 | 26 |
| 27 | 28 | 29 | 30 |
- Kubernetes
- Round Robin
- CodeBuild
- DNS
- CloudFormation
- write Through
- 유나인버거조인트
- cbt
- CodeCommit
- APIGateway
- S3
- SQS
- cloudwatch-agent
- server
- 3AZ
- 정보처리기능사
- ASG
- 쿠버네티스
- AWS
- 해킹송
- CloudWatch
- CodePipeline
- DaemonSet
- EKS
- access_log
- stateful
- istio
- Lambda
- Kinesis
- write back
- Today
- Total
cloud bee
AWS EKS 실습 입문( EKS 생성&연결, 도커 이미지 작성) 본문
오늘은 EKS를 실습해 보도록 한다.
우선 EKS를 시작하기 전에 VPC, 서브넷, 라우팅 테이블, 인터넷 게이트웨이, 보안그룹 등 기본적인 네트워킹 설정을 한다.
vpc.yml 파일로 stack을 작성하고 cloudformation을 통해 VPC를 생성하도록 한다.
아래는 vpc.yml에 기입할 내용이다. vpc.yml을 생성하고 파일 내용 안에 아래 코드들을 복붙 한다.
Description:  This template deploys a VPC, with a pair of public and private subnets spread
  across two Availability Zones. It deploys an internet gateway, with a default
  route on the public subnets. It deploys a pair of NAT gateways (one in each AZ),
  and default routes for them in the private subnets.

Parameters:
  EnvironmentName:
    Description: An environment name that is prefixed to resource names
    Type: String
    Default: 'aws-latest9'

  VpcCIDR:
    Description: Please enter the IP range (CIDR notation) for this VPC
    Type: String
    Default: 10.25.0.0/16

  PublicSubnet1CIDR:
    Description: Please enter the IP range (CIDR notation) for the public subnet in the first Availability Zone
    Type: String
    Default: 10.25.0.0/24

  PublicSubnet2CIDR:
    Description: Please enter the IP range (CIDR notation) for the public subnet in the second Availability Zone
    Type: String
    Default: 10.25.1.0/24

  PrivateSubnet1CIDR:
    Description: Please enter the IP range (CIDR notation) for the private subnet in the first Availability Zone
    Type: String
    Default: 10.25.9.0/24

  PrivateSubnet2CIDR:
    Description: Please enter the IP range (CIDR notation) for the private subnet in the second Availability Zone
    Type: String
    Default: 10.25.10.0/24

Resources:
  VPC:
    Type: AWS::EC2::VPC
    Properties:
      CidrBlock: !Ref VpcCIDR
      EnableDnsSupport: true
      EnableDnsHostnames: true
      Tags:
        - Key: Name
          Value: !Sub ${EnvironmentName}-vpc

  InternetGateway:
    Type: AWS::EC2::InternetGateway
    Properties:
      Tags:
        - Key: Name
          Value: !Ref EnvironmentName

  InternetGatewayAttachment:
    Type: AWS::EC2::VPCGatewayAttachment
    Properties:
      InternetGatewayId: !Ref InternetGateway
      VpcId: !Ref VPC

  PublicSubnet1:
    Type: AWS::EC2::Subnet
    Properties:
      VpcId: !Ref VPC
      AvailabilityZone: !Select [ 0, !GetAZs '' ]
      CidrBlock: !Ref PublicSubnet1CIDR
      MapPublicIpOnLaunch: true
      Tags:
        - Key: Name
          Value: !Sub ${EnvironmentName}-public-a

  PublicSubnet2:
    Type: AWS::EC2::Subnet
    Properties:
      VpcId: !Ref VPC
      AvailabilityZone: !Select [ 2, !GetAZs  '' ]
      CidrBlock: !Ref PublicSubnet2CIDR
      MapPublicIpOnLaunch: true
      Tags:
        - Key: Name
          Value: !Sub ${EnvironmentName}-public-c

  PrivateSubnet1:
    Type: AWS::EC2::Subnet
    Properties:
      VpcId: !Ref VPC
      AvailabilityZone: !Select [ 0, !GetAZs  '' ]
      CidrBlock: !Ref PrivateSubnet1CIDR
      MapPublicIpOnLaunch: false
      Tags:
        - Key: Name
          Value: !Sub ${EnvironmentName}-priv-a

  PrivateSubnet2:
    Type: AWS::EC2::Subnet
    Properties:
      VpcId: !Ref VPC
      AvailabilityZone: !Select [ 2, !GetAZs  '' ]
      CidrBlock: !Ref PrivateSubnet2CIDR
      MapPublicIpOnLaunch: false
      Tags:
        - Key: Name
          Value: !Sub ${EnvironmentName}-priv-c

  NatGateway1EIP:
    Type: AWS::EC2::EIP
    DependsOn: InternetGatewayAttachment
    Properties:
      Domain: vpc

  NatGateway2EIP:
    Type: AWS::EC2::EIP
    DependsOn: InternetGatewayAttachment
    Properties:
      Domain: vpc

  NatGateway1:
    Type: AWS::EC2::NatGateway
    Properties:
      AllocationId: !GetAtt NatGateway1EIP.AllocationId
      SubnetId: !Ref PublicSubnet1

  NatGateway2:
    Type: AWS::EC2::NatGateway
    Properties:
      AllocationId: !GetAtt NatGateway2EIP.AllocationId
      SubnetId: !Ref PublicSubnet2

  PublicRouteTable:
    Type: AWS::EC2::RouteTable
    Properties:
      VpcId: !Ref VPC
      Tags:
        - Key: Name
          Value: !Sub ${EnvironmentName}-public-rt

  DefaultPublicRoute:
    Type: AWS::EC2::Route
    DependsOn: InternetGatewayAttachment
    Properties:
      RouteTableId: !Ref PublicRouteTable
      DestinationCidrBlock: 0.0.0.0/0
      GatewayId: !Ref InternetGateway

  PublicSubnet1RouteTableAssociation:
    Type: AWS::EC2::SubnetRouteTableAssociation
    Properties:
      RouteTableId: !Ref PublicRouteTable
      SubnetId: !Ref PublicSubnet1

  PublicSubnet2RouteTableAssociation:
    Type: AWS::EC2::SubnetRouteTableAssociation
    Properties:
      RouteTableId: !Ref PublicRouteTable
      SubnetId: !Ref PublicSubnet2


  PrivateRouteTable1:
    Type: AWS::EC2::RouteTable
    Properties:
      VpcId: !Ref VPC
      Tags:
        - Key: Name
          Value: !Sub ${EnvironmentName}-priv-a-rt

  DefaultPrivateRoute1:
    Type: AWS::EC2::Route
    Properties:
      RouteTableId: !Ref PrivateRouteTable1
      DestinationCidrBlock: 0.0.0.0/0
      NatGatewayId: !Ref NatGateway1

  PrivateSubnet1RouteTableAssociation:
    Type: AWS::EC2::SubnetRouteTableAssociation
    Properties:
      RouteTableId: !Ref PrivateRouteTable1
      SubnetId: !Ref PrivateSubnet1

  PrivateRouteTable2:
    Type: AWS::EC2::RouteTable
    Properties:
      VpcId: !Ref VPC
      Tags:
        - Key: Name
          Value: !Sub ${EnvironmentName}-priv-c-rt

  DefaultPrivateRoute2:
    Type: AWS::EC2::Route
    Properties:
      RouteTableId: !Ref PrivateRouteTable2
      DestinationCidrBlock: 0.0.0.0/0
      NatGatewayId: !Ref NatGateway2

  PrivateSubnet2RouteTableAssociation:
    Type: AWS::EC2::SubnetRouteTableAssociation
    Properties:
      RouteTableId: !Ref PrivateRouteTable2
      SubnetId: !Ref PrivateSubnet2
visual studio를 통해 vpc.yml을 생성한다. 사전에 미리 visual studio에 aws configure 설정을 한다.(root 권한 부여)
이제 aws configure 설정까지 끝마쳤다면 아래와 같은 명령어를 입력하여 cloudformation stack를 생성하도록 한다.
aws cloudformation create-stack --stack-name vpc-stack --template-body file://vpc.yml
해당 vpc.yml은 다음과 같이 생성된다.
- VPC 이름: aws-latest9-vpc (cidr: 10.25.0.0/16)
- 퍼블릭 서브넷(2): aws-latest9-public-a(cidr: 10.25.0.0/24), aws-latest9-public-c(cidr: 10.25.1.0/24)
- 프라이빗 서브넷(2): aws-latest9-priv-a(cidr: 10.25.9.0/24), aws-latest9-priv-c(cidr: 10.25.10.0/24)
음 라우팅 테이블도 사진과 같이 알맞게 생성된다.
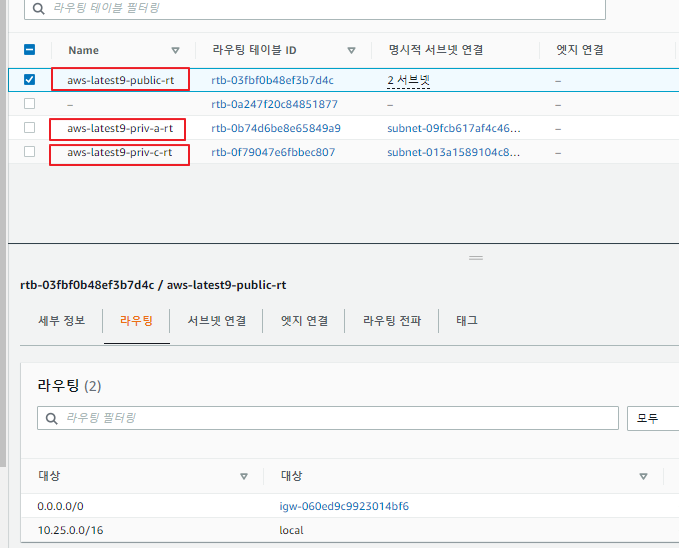
priv 라우팅 테이블은 public subnet을 향해 nat gateway로 이동한다.
public 라우팅 테이블은 인터넷 게이트웨이와 연결된다.
이제 VPC를 cloudformation을 통해 생성하였다면 bastion-host를 생성하도록 한다. 해당 bastion-host를 통해 EKS를 사용할 것이다. 우선 보안그룹부터 생성하자.
해당 bastion host의 보안그룹은 bastion-SG로 지정한다.

보안을 위해 내 IP만 접근 가능하게 설정하자.
이제 bastion-SG를 생성하였다면 EKS-cluster에서 사용할 보안그룹을 생성해 준다.

다음과 같이 설정하고 생성한다.
이제 ec2에 들어가서 bastion host를 생성해 준다.


탄력적 IP를 연결하고 터미널에 접속한다.

ssh -p 22 ec2-user@<본인의 EIP주소> -i "key pair 경로"
이제 awscliv2와 kubectl, eksctl, docker를 설치해 준다.
아래와 같은 명령어를 입력하여 패키지를 설치해 준다.
sudo yum update -y

sudo yum install docker -y

sudo usermod -aG docker ec2-user

curl -LO https://dl.k8s.io/release/v1.23.0/bin/linux/amd64/kubectl

sudo install -o root -g root -m 0755 kubectl /bin/kubectl

curl "https://awscli.amazonaws.com/awscli-exe-linux-x86_64.zip" -o "awscliv2.zip"

unzip ./awscliv2.zip

sudo ./aws/install

sudo mv /usr/local/bin/aws /bin/aws

curl --silent --location "https://github.com/weaveworks/eksctl/releases/latest/download/eksctl_$(uname -s)_amd64.tar.gz" | tar xz -C /tmp

sudo mv /tmp/eksctl /bin/eksctl

sudo systemctl restart docker
Dockerfile과 index.html을 작성한다.
cat << EOF > Dockerfile
FROM nginx:latest
COPY index.html /usr/share/nginx/html/index.html
EOF
cat << EOF > index.html
<h1> HelloWorld </h1>
EOF
해당 도커파일은 nginx image를 사용하였다. 해당 도커파일은 HelloWorld라는 문구를 띄운다.
이제 bastion host를 재접속을 한다.
그리고 AWS IAM에 접속하여 root access key를 발급받는다.

발급받은 access key를 재접속한 bastion host의 aws configure 정보로 기입한다.

이제 ecr을 생성한다.
aws ecr create-repository --repository-name aws-ecr

해당 푸시명령어로 ecr에 이미지를 푸시하도록 한다.
이제 푸시하였다면 EKS를 생성해 준다. cluster iam 역할은 아래 링크를 통해 참고하여 생성하면 된다.
https://docs.aws.amazon.com/ko_kr/eks/latest/userguide/service_IAM_role.html
Amazon EKS 클러스터 IAM 역할 - Amazon EKS
Amazon EKS 클러스터 IAM 역할 Amazon EKS에서 관리하는 Kubernetes 클러스터는 사용자 대신 다른 AWS 서비스를 호출하여 서비스에 사용하는 리소스를 관리합니다. Amazon EKS 클러스터를 생성하려면 먼저 다
docs.aws.amazon.com


서브넷은 프라이빗 서브넷으로 지정하고 eks-cluster을 생성해 준다.
보안그룹은 방금 전 생성하였던 EKS-SG를 선택하여 생성한다.
클러스터가 완전히 다 생성될 때까지 기다리도록 하자.

이제 클러스터를 생성하였다면 bastion host 터미널로 접속하여 다음과 같은 명령어를 친다.
aws eks update-kubeconfig --region ap-northeast-2 --name eks-cluster


이제 해당 클러스터가 정상적으로 연결된 걸 확인하였고 조회까지 성공한 모습을 확인할 수 있다.
'AWS > kubernetes' 카테고리의 다른 글
| AWS EKS calico 설치 및 방법 (0) | 2023.02.05 |
|---|---|
| kubernetes daemonset 이란? (0) | 2023.01.11 |
| 3AZ VPC를 cloudformation을 통해 생성 (0) | 2022.10.31 |
| AWS EKS에서 EFS 기능 구현하기 (0) | 2022.10.23 |


